how to reset canon printer to factory settings can be a handy solution when you’re facing persistent issues or simply want to start fresh. Whether it’s connectivity problems, error messages, or performance issues, a factory reset can often resolve them. In this article, we’ll walk you through the simple steps to reset your Canon printer to its original settings.
1. Prepare Your Printer:
- Ensure your Canon printer is turned on and connected to your computer.
2. Access the Reset Menu:
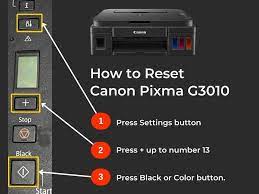
- On the printer’s control panel or display screen, navigate to the “Settings” or “Setup” menu. The exact location of this option may vary depending on your printer model.
3. Choose “Device Settings” or “System Settings”:
- Once in the “Settings” menu, look for options related to “Device Settings” or “System Settings.” These options typically contain the reset feature.
4. Select “Reset to Factory Defaults”:
- Within the “Device Settings” or “System Settings” menu, locate the “Reset to Factory Defaults” or similar option. This is the key setting you need to select.
-
A factory reset is an effective way to resolve software-related issues and start afresh with your Canon printer. However, if your printer issues persist after the reset, it might be a sign of a hardware problem, and you should consider contacting Canon’s customer support for further assistance.
canon printer reset settings By following these steps, you can easily reset your Canon printer to its factory settings, potentially resolving any troublesome issues you’ve been experiencing.